


Product Description
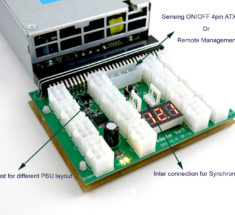
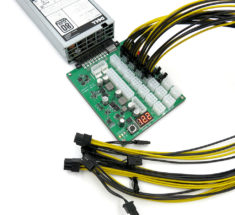
Power Supply Remote Management Board
Experienced cryptocurrency miners know that when your miners begin to act erratically or under-perform, the best solution is usually a Hard Reset "Power Cycle". But what happens when you're not near your mining facility or if you're away on vacation? Until today you only had two options: going out of your way to get to your miners or purchasing a Switched PDU that can easily cost over $1,500. With that in mind, we created this Remote management board as a third, cost-efficient option.
Set Up Configuration
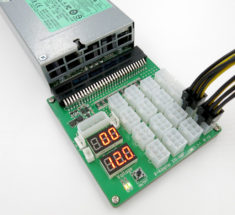
Connect the board to your router with an Ethernet cable and then connect the board to PSU #1 in your chain with our interconnect cable. Then access the Remote Management through our user-friendly, highly-intuitive Web interface. Once in the Web interface, you can remotely turn all chained PSUs on or off with 1 click. Or, alternatively, use the automated power cycle feature to hard reset your farm every 3, 6, 12, or 24 hours! Just set it and let the automated restart feature do the work for you.
Features:
- Compatible with all Network Routers
- Remote On/Off
- Automated Power Cycle with intervals between 2 minutes and 24 Hours.
- Remotely Manage up to 12 Power Supplies
- Easy to use Web Interface
- Foam padding with adhesive for easy mounting
Specifications:
- Power Input: 2A 5V
- Power Input Connector: Micro USB
- Network Connectivity: LAN RJ45
Remote Management Package Contents:
- (1) XRMT-V1 module
- (1) 4-pin to molex interconnect cable
- Printed Manual PDF format available here
Requirements:
- Ethernet Cable. Not Included
- Power Adapter and Micro USB cable. Not Included.
Valuable information provided by Mike H. on May 27, 2022
I hope you consider this post useful as it will help advanced users address most of the shortcomings that we (including I) note here. And/or contact me for original file for perhaps an app note.
This is a compact embedded system with a mips cpu and 7620 wifi SOC
type chip that is somewhat ubiquitous and designed specifically for openwrt – which is what it is running.
It has a modest amount of cpu and flash and runs well within it’s resource limits.
root@DYDTECH:/usr/dydtech/shell/puolin# ./status-model-ver-mac.sh
frontmsg: endmsg
# This is a static message. Typo on company name (DYDTECH); I have no
# idea what puolin means – but I’m presuming it’s their hardware board or code name
# 2018 date which is likely of final distro as my units are 2021
# mt7620 is the wifi SOC chipset which is designed for wifi running openwrt
# This is what is displayed and also note that that mac address (a) matches
# the sticker, but (b) is not correct (all mine were off by one)
# So if you want you can fix the company name typo; add in yours 😉 and if needed
# fix the mac address.
root@DYDTECH:/usr/dydtech/shell/puolin# uname -a
Linux DYDTECH 3.18.36 #95 Fri Nov 9 19:56:42 CST 2018 mips GNU/Linux
root@DYDTECH:/usr/dydtech/shell/puolin# cat /etc/openwrt*
DISTRIB_ID=’OpenWrt’
DISTRIB_RELEASE=’Chaos Calmer’
DISTRIB_REVISION=’r49404′
DISTRIB_CODENAME=’chaos_calmer’
DISTRIB_TARGET=’ramips/mt7620′
DISTRIB_DESCRIPTION=’OpenWrt Chaos Calmer 15.05.1′
DISTRIB_TAINTS=’no-all busybox’
15.05.1
The web server is nginx (which I’m not familiar with at all )
Now I will admonish all the techno’s out there – including myself – that WHINED
about missing features before we even tried the basics. And the basics work.
But let’s back up. Since I foolishly didn’t just try telnet (works) or ssh (doesn’t but easily fixed)
I hooked up to the serial port (note the “vcc rx tx gnd” on the 4 pin that’s classic serial port!)
I used adafruit 954 https://www.adafruit.com/product/954 with plug connections but
Note: You may need to swap TX and RX and be sure to set putty et al to 111520 baud and it came up as COM5 on WinDoz
But immediately console login – with guess what? admin/admin . Yeah. Gotta change that.
But then an easter egg! A Mixed drink recipe! Not sure if that is openwrt or DYDTECH. I’m betting openwrt.
Ok though – I started with serial port as I figured doom and gloom (as all our comments were largely wrong)
so I’ll just note that you NEED that adafruit cable – just for other stuff.
For now – you can just telnet in. Yup. Telnet is open and configured.
SSH IS CONFIGURED but has a slight problem that is easily addressed. Note the ssh server is dropbear (normal for openwrt) and has non standard paths and files.
So let’s get started. The following only a tad different if coming in from console or telnet.
DYDTECH login: admin
Password:
login: can’t change directory to ‘/admin’ #(we’ll fix this)
BusyBox v1.23.2 (2018-05-26 11:14:18 CST) built-in shell (ash)
root@DYDTECH:/
# Before you get too excited, like me, this is that 2018 version of openwrt
# and it’s a trimmed distro – so vim and a lot of commands and command options
# us power users are accustomed to aren’t available. So us web/openwrt web as your reference
# when making core linux changes.
# You can probably add a bunch of these with opkg or whatever for openwrt.
root@DYDTECH:/# cd /usr/dydtech
root@DYDTECH:/usr/dydtech# ls
shell www
# The “www” directory is the web server dynamic page directory tree
# This is largely php for nginx used to dynamically generates the web pages.
# Note that fortunately only I 😉 had to wade in there before finding
# the core scripts that do the linux/openwrt commands
# We’ll leave these untouched as largely not necessary for our ssh and related goals.
# The “shell” directory contains all the scripts thaat “do something”
# from the web pages *except* the power control and information are in a subdirectory
# So if you want you could grok these and manually configure without the web interface
#
# Do note the “funny” output message formats are intended for groking parsing
# by the web components. No harm. No foul.
root@DYDTECH:/usr/dydtech# cd shell
root@DYDTECH:/usr/dydtech/shell# ls
nginx-port.sh system-lan-ip-mask.sh
puolin system-upgrade.sh
system-config-apply.sh system-wan-proto-ip-mask.sh
# I’m not going into these as I’ve already configured through the web and it’s probably easier that way
# than groking these scripts.
#The “puolin” subdirectory directory contains the power control AND the model/version display scripts
root@DYDTECH:/usr/dydtech/shell# ls puolin
gpio-power-control.sh status-model-ver-mac.sh
root@DYDTECH:/# cd usr/dydtech/usr/dydtech/puolin#
root@DYDTECH:/usr/dydtech/shell/puolin# ./gpio-power-control.sh help
gpio-power-control set powerstate state
gpio-power-control set cycle time
gpio-power-control get powerstate
gpio-power-control get cycle
gpio-power-control docycle
eg:gpio-power-control set powerstate 1
eg:gpio-power-control set cycle 3
root@DYDTECH:/usr/dydtech/shell/puolin# ./gpio-power-control.sh get powerstate
frontmsg: endmsg
root@DYDTECH:/usr/dydtech/shell/puolin# ./gpio-power-control.sh get cycle
frontmsg: endmsg
root@DYDTECH:/usr/dydtech/shell/puolin# ./gpio-power-control.sh docycle&
root@DYDTECH:/usr/dydtech/shell/puolin# ./gpio-power-control.sh get powerstate
frontmsg: endmsg
root@DYDTECH:/usr/dydtech/shell/puolin# frontmsg: endmsg
root@DYDTECH:/usr/dydtech/shell/puolin# ./gpio-power-control.sh get powerstate
frontmsg: endmsg
[1]+ Done ./gpio-power-control.sh docycle
root@DYDTECH:/usr/dydtech/shell/puolin#
# So now we know how to invoke all the power control type commands.
#let’s Change password:
root@DYDTECH:/admin passed admin
#enter your new password at each prompt; if you wish you can ignore warnings about weak passwords.
SSH:
The SSH server is dropbear and it is running by default.
I haven’t sorted out root password – but “admin” runs as root
Note that the /admin directory doesn’t exist so SSH daemon will terminate your session after successful password if /admin does not exist (and this is the normal case here)
Make the /admin directory:
mkdir /admin
Now you should be able to ssh into the box as admin
ssh admin@
I’m not going to go into authorized_keys as dropbear does it differently, using alternate directories in this case, yada yada
Now perhaps you don’t like or can’t remember that gpio command – AND you want to just come in as admin and execute it.
So let’s create a symbolic link to the gpio script that’ll be sitting there when you ssh (or telnet) in
cd /admin #if not there already
ln -s rpower /usr/dydtech/shell/puolin/gpio-power-control.sh
I used ‘rpower’ as the command name as that is common in IT for (remote)power control.
Now you can log in and invoke directly. Note that running as root and a local file you must preceed it with ./ as in
root@DYDTECH:/admin ./rpower –help
Or via ssh:
root@MyMinerCtl:~# rsh admin@192.168.0.221 /admin/rpower get powerstate
admin@192.168.0.221‘s password:
frontmsg: endmsg
A couple of remaining issues:
1) The web password is not changed. I’m not an nginx dude and this config also appears atypical so I don’t know where to change the http auth stuff.
2) https requirement for nginx – Again I’m not an nginx dude and since I use HIVEOS I removed the port forwarding for these. Still would be nice.
3) Passwordless ssh: “dropbear” uses different paths and I haven’t sorted them out yet. And often I tire of getting *every* possible client in authorized_keys
4) disable telnet (probably that is easy)
5) update to current distro to pick up setcurity patches. From what I’ve read openwrt doesn’t do well maintaining configuration during upgrade. And we’re 4 years later.
6) enable wifi? The 7620 is a somewhat ubiquitous wifi chipset. Is there an antenna? I don’t see one and I haven’t tried to configure or enable it.

Robert Benoit (verified owner) –
Couldn’t get it to work. It powers on but I didn’t get the board hooked up with the rest of the system. 3 stars for that.
Joseph g (store manager) –
Hi Robert, give us a call we will help you set the remote up.
Nickolas (verified owner) –
Fast shipping! Works great right out of the box. Exactly what I was looking for. The online manual has the login information, but the printed version that came with it is missing this info. Default user and password is “admin”
Joseph g (store manager) –
The module must be powered using a Micro USB cable. Any phone charger or power bank or USB port will do. However, do not use the GPU rig motherboard USB port in which the module is intended to power. You will be in a CATCH22! As when the motherboard is powered off, they will be no power sent to the module from the USB port!
ocinternational –
Hello, could you use this power management module with ATX power supply and PSU server combined? thanks for he info
Joseph g (store manager) –
The management module was designed to control the X6,7,11 adapters. It cannot control an ATX power supply directly or indirectly. However, in another scenario. If you were to use this item instead of an ATX power supply https://www.parallelminer.com/product/180watt-max-24pin-atx-power-module-included-sata-molex-cpu-power-connectors-ditch-your-atx-power-supply-entirely/
You would be able to hard power cycle your entire system. Motherboard, GPU, and Server PSU. If this is a system for GPU mining I see zero gain using an ATX power supply. Finally, the X adapter can co-exist with an ATX power supply and when a restart is trigger on the motherboard the server PSU connected to the X adapter will also power cycle.
andrusalumae –
im stuck at the login screen, what account should i use ? crated an account with parallel miner but that dosent work either so im stuck. currently if i hook it up it will turn my rig off after 30 minutes.
Joseph g (store manager) –
User:admin
password:admin
Joseph g (store manager) –
Also, check this video https://www.youtube.com/watch?v=vv_F-OcmQO8&feature=emb_logo
Harry (verified owner) –
awesome works so far as intended.
Harry J HIGHTOWER (verified owner) –
awesome
Harry J HIGHTOWER (verified owner) –
works as intended, great !!
Harry J HIGHTOWER (verified owner) –
great
Anonymous (verified owner) –
You can make one of these with a $5 Sonoff, or buy a $15 if you wanted something that works out of the box. At a price 3+ times that of comparable products, it’s baffling that this doesn’t support PoE and that it doesn’t offer basic features like DHCP and SSH.
Dartellum –
I finally got this connected. I changed the IP, connected to the ZSX board, and then 1 hour later it booted the rig. I had to change to “no set” and press “Set” on the Power tab. On the Power or Status tab, could you display the current schedule? Also, could you document this may have a setting from the factory until the schedule is displayed?
Once this was corrected, the board works as expected.
Albert.S (store manager) –
Thank you for the feedback. We will make a note of your suggestion for our next version of the remote management or firmware update.
Darren (verified owner) –
Good quality at a fair price.
shawnli87 (verified owner) –
It is extremely disappointing that not only has the promised SSH firmware update has not materialized, but the very basic and standard DHCP capability is missing. Because of this my router does not recognize the board, so it can’t be port forwarded. So now I have wasted $47 on a product that can’t be accessed outside of my home network, which defeats the purpose of a “remote power management module.”
Joseph g (store manager) –
Hi Sawn
So as long as you are on the same subnet there is no need for DHCP! Example: Your router lease IP to subnet 192.168.2.xx just set the remote IP static as 192.168.2.200 and any computer on the subnet will be able to access the remote. If you give the remote a port address other than standard 80, Example 8151 TCP then you would access it as follow 192.168.2.200:8151.
Anonymous (verified owner) –
shawnli87 (verified owner) –
Joseph, you missed the point. My router will not recognize the device unless it uses DHCP (which is standard for a device to use). Since my router doesn’t recognize it, port forwarding does not work, and it cannot be used remotely.
Joseph g (store manager) –
No Sir, I know very well what I am talking about. You want the DHCP because you think you need this to access the remote default IP address, so you can at least change it. Your router does not need to recognize anything. If you are on the same subnet address you are on the same network and any devices or computer can communicate regardless of your Router “Unless you specifically block this in firewall setting. Now, since your computer is getting a dynamic IP address from your router, which is most likely on a different subnet you can’t reach the remote. That is incorrect, you can! Temporarily set your network adapter to static IP 192.168.1.10. 255.255.255.0 Gateway 192.168.1.1. Save, then open a browser and access the Management remote at 192.168.1.100 User: admin pass: admin | Change the Ip address of the remote to match your own router subnet, save, exit, go back to your adapter setting and reselect DHCP. Problem solves and now you can access the remote. DHCP is a process to assign IP addresses automatically – dynamically, that does not mean you cannot assign a specific one manually.
shawnli87 (verified owner) –
No joseph, you don’t know what you’re talking about. I know how to do that. You’re completely ignoring my issue. I CANNOT PORT FORWARD WITHOUT DHCP. As in setting it up to connect from OUTSIDE MY HOME NETWORK! My router will not forward the port, because the router did not assign the IP address and it doesn’t see the device. You should listen to your customers problems instead of talking down to them and ignoring their actual issue.
Joseph g (store manager) –
Perhaps I missed understanding your meaning. I apologies. I’ve been in the computer industry since 1988. I have never seen a router that will not allow port forwarding on static IPs. However, it’s been a few years since I purchased a router. As they try to make them more user-friendly it’s possible they remove the user ability to control the network.
Joseph g (store manager) –
If you cannot find a solution. Simply request an RMA and we will send you a prepaid label and issue a full refund.
Joseph g (store manager) –
Final thought, worth exploring. When you set up your router you have an option of range for DHCP lease IPs. Could it be possible if that range is the entire subnet IE: 192.168.1.2 / 192.168.1.255 then your router knows they cannot possibly be static IP! Try to decrease the DHCP range so that the router allows static. Let me know if that works.
mdedetrich –
So I have the same problem as Robert Benoit, the Remote works perfectly fine when it comes to cycling the PSU but the problem is that when you are using a standard ATX motherboard (in my case a ASUS B250 Mining Board) you still need to manually turn on the motherboard using the 2 PIN power jumper (this is your typical power button).
Is there a way to connect the motherboard 2 pin power jumper to the remote so that its possible to both power cycle the PSU AND turn on the actual system? Otherwise its kinda pointless because you still need someone physically there to power on the system after a power cycle. It seems like this remote was only designed for ASIC’s in mind where you don’t have a separate power button.
Joseph g (store manager) –
Hi, here is the solution. In the motherboard bios setting there is an option that says the following. “In the event of a power failure should I start back on when the power returns?” Of course, the option is a most likely name like PWFAIL on/off. Just set this to on and when you use the remote management your system will reboot automatically
Tony C. (verified owner) –
Alexander (verified owner) –
Brad C. (verified owner) –
Great addition to your Rig, one more level of remote management control for when your OS stops responding.
Karsten Welskop (verified owner) –
Works fine. High quality. Fast delivery.
Mark Smylie (verified owner) –
This seems awesome but haven’t had time to try it yet.
Andre C. (verified owner) –
Joshua Reola (verified owner) –
Hi. The module reboots the system every hour despite the settings in the GUI is set to not do this. I had to remove it. Is this a faulty device?
Joseph g (store manager) –
Set it to OFF and click apply
Anrijs Klepca (verified owner) –
LOVELY
Mads Rolf (verified owner) –
David (verified owner) –
John N. (verified owner) –
Works Great and if you want remote access use it with cloudflare one.
anthony turner (verified owner) –
PALANISAMY (verified owner) –
Faster delivery and working as expected.
Warren DeLarme (verified owner) –
You did well but need to find better than fedwreck, that shipper is a disaster
Joseph g (store manager) –
Warren, Are you sure about that? 🙂
DRTWMS (verified owner) –
Hello Joseph, I AM VERY NEW TO THIS !!! I’m having issues getting on your remote management module. I’m using a MacBook Pro to set this all up. Do you have any videos or instructions for a MacBook setup?
Taariq Waja (verified owner) –
Great concept but zero functionality.
No DHCP
No API
No SSH
The UI Literally only has the ability to set a static IP (no dhcp) and switch the unit off and on.
Yes there is an option to update firmware if there will ever be an update released, judging by the comments from over 2 years ago i highly doubt it.
I think the Firmware upgrade you have mentioned over 2 years ago is long overdue, if this project has no more development being done to it then please advertise it as EOL (end of life). “Joseph g (store manager)” mentions how revolutionary the device was for there farm using reboot scripts, unfortunately Joseph your customers cannot have the same revolutionary experience using your product due to the lack of integration ability, a simple API would go a long way.
The functionality and features does not warrant purchasing this over a simple Sonoff device which costs 1/10th of the price.
I bought 5 of these with the hopes of testing in order to streamline a farm but unfortunately these will now sit in the cupboard in the box labeled “failed projects”
Joseph g (store manager) –
Thank you for sharing your thoughts, we appreciate it. Please contact me on our contact page. I would be happy to issue an RMA for a refund.
Carl G. (verified owner) –
gferguson79q –
I have fought with this device for several weeks and cannot get it to work. My router fails to find the module and I believe it due to the lack of DHCP support. Is there a work around for this, or am I stuck with a device and the extra connecting cables I purchased that cannot perform the very function for which it is advertised? Please advise!
Joseph g (store manager) –
Your router does not need to find anything if you put the remote on the same subnet IP address. For example, if your router DHCP Ip of 192.168.1.xx then just set the remote to example 192.168.1.255. You will be able to access the remote from your network by simply putting in your browser 192.168.1.255.
Donald P. (verified owner) –
I’my life has evolved into waiting on stuff from PM. Due to their awesome service, I never have to wait long. Keep up the solid work!
Chris (verified owner) –
Works as expected
umarali1 (verified owner) –
Can someone get back to me. I submitted RMA (PM-RMA-13972408 created on 08/24/2021 9:34 am) i haven’t heard anything back. TBH this product sucks and I feel outdated stuff is being sold here with really slow response. NOT Happy with your service and support so far.
Kim H. (verified owner) –
ARRIE GLOVER (verified owner) –
Romeo (verified owner) –
Anonymous (verified owner) –
Barton B. (verified owner) –
Great value!
Gabriel (verified owner) –
So far so good.
gatekeeperjm (verified owner) –
Great device. Working great on my rig. To the people who are having a hard time connecting the device. Your router ip address is probably not 192.168.1.xx like my router. Dont worry its a very easy fix. To connect this device to your router. Open the settings on an android phone connected to the router( i dont know the way for iphone) , click connections , click wifi , click the settings on current network , click advanced , click ip settings and choose static, then take a screen shot or write it down on paper. Then you need a laptop or desktop. Once on the computer go to settings and turn off wifi if you have it on and unplug the lan cable if you have one connected to it. Then go to settings click “network & internet” , click “change adapter options” , right click “local area connection” and choose properties, select “internet protocol version 4”, click “properties, select “use the following ip address” , enter ip address 192.168.1.200, subnet mask should auto fill when you click it but if it does not just put 255.255.255.0, enter default gateway 192.168.1.10, enter preferred dns server 8.8.8.8, click ok then close. Now you need to connect the remote module to the laptop or desktop using a lan cable. When your power the module wait for the 2 green leds to stay on. Now go to your internet browser and enter 192.168.1.100. enter admin for admin and admin for password. Then click lan, change the third number of the ip address (for example: 192.168.1.100 to 192.168.0.100) to your third number on your ip address that you got on the android settings, another example is my android ip setting is 192.168.0.59 so i would change the ip address on the module to 192.168.0.100. Then change the gateway to the same gateway address you got from your android settings. After that click save and logout. Then unplug the lan cable and connect the module to the router. Go back to your network settings on the computer and change the “internet protocol version 4” back to obtain an ip address automatically and obtain dns server address automatically. Now turn on wifi or connect your computer to the router. After open a browser and enter the ip address that you put on the module and it should connect. Thats the steps i did to change the ip address cause my router was set to 192.168.0.xx and on the module is on 192.168.1.100. For accessing it from the internet search google “portforwarding ip camera and your router name”. the steps are the same for ip camera and your module. Thanks again parrallelminer for the great device. This was the last piece i needed for my 13 gpu rig to make it remote accessible.
Andrew Doering (verified owner) –
Works great, easy to set up. Most bad reviews seem like people having challenges setting up port forwarding. DHCP has nothing to do with port forwarding. If you can’t figure out how to set up a simple port forward, maybe you should consider a different hobby. SSH would be nice, but what I’d like even more is an Android app, since I’ll mostly be accessing this from my phone when I’m away.
Raymond (verified owner) –
Albert.S (store manager) –
test
Christian K. (verified owner) –
work really well!
Eric M (verified owner) –
Not sure what all the complaints are about. Like the ignorant guy claiming he NEEDs DHCP to port forward… Do you really want to open anything to the internet when you can create a VPN on an RPi for $50? Do you know what you’re talking about re: DHCP?
This has saved me having to drive home to power cycle my rig(s) when I applied a little too aggressive OC that ran great until I left the house
This device allows the ability to remote in (over a VPN of course) and power cycle a PM breakout board.
I wanted nothing else from this device and it’s working exactly like I expected. I don’t need SSH nor an API. My need to remote power cycle is extremely rare but this is a backup insurance policy that saves me a drive.
Thanks for the great stuff!!
Mike Harris (verified owner) –
Works – BUT
1) Each of 5 I bought the MAC address on the sticker was off by one. Not a huge deal as I could identify through router
2) Web display shows the sticker address – not the correct mac address that is presented on the network.
Please fix manufacturing so (a) the MAC Address sticker is correct, and (b) the web interface always shows the actual from hardware MAC address.
3) No way to change default password – this is a HUGE security risk
4) No way to change network name – a pretty basic thing; I’ve assigned a name in router – but it should be able to show a name I give it.
5) No SSH. It’s been years since you’ve discussed it. Enough – give us SSH! Then I could cold control it from HiveOS window and not have to expose externally through port forwarding (Esp considering the default user/password)
6) No way for one-click “power cycle” eg one click and it turns off, sleeps 10-15 seconds, and turns on. Schedule is there – but not “single power cycle now”
7) Not POE . Nowadays this should be POE capable. It requires two cables – power and ethernet. Should be able to do POE
To me the biggest issues are:
Security Risk of fixed user/password
No SSH (which would allow access via say Hive OS and not require exposure via port forwarding).
The rest strongly desired.
charles1 –
Does anyone know if these are getting restocked anytime soon?
Joseph g (store manager) –
We should have stock sometime next month
Graig Oteri –
Port forwarding was very easy to setup, but I can only get it to work on port 80. Will this module work on other ports, and which ones? If not, I’ll just setup a vpn. Thanks.
Joseph g (store manager) –
Hi Graig, the port default of any web browser is 80 or 443 for secure. If you are let’s say setting up the Lan of the module with port 5050 on IP 192.168.2.1 then inside your network the browser IP address to access the module will be as follow 192.168.2.1:5050. If you set up port forwarding in your router, then from outside your LAN “Internet_Anywhere” it would be your WAN IP:5050 or Domain_Name:5050. I’m sure you know all of this already! Just in case… Cheers
Graig Oteri –
Hi Joseph, I figured it out. The problem was that I had to go into the admin for the XMRT device under LAN -> LAN SET -> PORT (and change the port from 80 to my new port. That is why my port forwarding wasn’t working on any port outside of 80. All set now. Thanks.
Joseph g (store manager) –
Graig, thanks for the update.
Roberto T. (verified owner) –
Haven’t received this item, available by end of May.
Joseph g (store manager) –
May 28th we will start shipping. Today is not May 28th!
daeshik –
I assume this device will power recycle the whole daisy chain of PSUs. But want to confirm that is the case and cannot control each individual PSU connected.
Thank you!
Joseph g (store manager) –
You are correct “it cannot control each individual PSU connected” this is under development within an entirely new line of smart breakout boards. Here if you have up to 10 PSU interconnected together and on the first one you connect the remote module, once you trigger a power cycle ALL will power cycle.
Roberto Tercero (verified owner) –
I received the remote module today May 28th, awesome! This one look different than the one pictured on the site or video tutorial; no reset button, seems smaller – Is this a newer version? I hooked it up, easy, at least while on-site on the same IP Network. I really would like to trigger an “OFF” event on a schedule, example would be daily at 16:00 hours – I then would like to trigger an “ON” event on a schedule, also daily at 21:00 hours. I see a manual trigger option for ON/OFF, and then a power cycle interval with hours to choose from a drop-down; no calenda? Any way I could do this with a script?
Joseph g (store manager) –
Hi Roberto, because of the chips shortage we had to do small changes. We will have a firmware update that will make it exactly like the previous one. Go back to the listing descriptions and check the last section. The information was provided by one of our users. I’m sure you will find it very ueful
derrick pridgen (verified owner) –
Have 2 older remote module works great this new version one i could connect to but wouldn’t change ip address would just default back to 192.168.1.100. did a reboot holding the reset button down for 10-15 sec as the manual states now i cant connect to it, the led next to the power connection just flashes on and off every 30 sec. doesn’t show up on my router.
Joseph g (store manager) –
We are in the process of updating the firmware. We should have it early nest week for download
Anonymous (verified owner) –
really awesome 🙂
renze9 (verified owner) –
Joseph, where can we download update firmware for the revised module? Any news when it is released?
Joseph g (store manager) –
Two files need to be updated. Please check the video first. This is for the last May 28th release board only and not to be applied on our version 1. https://drive.google.com/drive/folders/1e371xvOHyLdKSKoWVWo3MLVRL-j713f4?usp=sharing
Trevor (verified owner) –
Definitely need some feedback updated model is not connecting to the internet
Droopydroors (verified owner) –
How do you reset the new batch? I tried to set up like the old ones but after the new ip did not stick the login screen doesn’t even come up. So how can you update firmware if you can’t even access login page? I’ve tried holding down the reset button on the top for 10 seconds and it does not reset like the old ones. What is the flash button for on the board?
Joseph g (store manager) –
We an updated firmware for the new model. Please see the following files. https://drive.google.com/drive/folders/1e371xvOHyLdKSKoWVWo3MLVRL-j713f4?usp=sharing
Droopydroors (verified owner) –
If you can’t get to login screen to login you can’t update!!!
derrick pridgen (verified owner) –
Updated review after updating the firmware everything works as it should thanks. also used advanced ip scanner to find what ip it was using so i could update the firmware.192.168.1.100 stopped working but found it was using a different one .
cpit (verified owner) –
I have one of the original versions of these. After messing around with it a bit recently I thought I’d add a couple clarifications re others’ comments above.
1. You can easily change the default password via the web GUI (top right corner) or with CLI access via telnet or ssh (as outlined in the info graciously provided by Mike H. above).
2. ***DHCP IS POSSIBLE***
After accessing the device with telnet or ssh (again as outlined above in Mike H.’s notes), to switch to DHCP:
edit /etc/config/network: need to use vi, as nano isn’t installed and likely not installable given the limited storage capacity of this device. (Probably want to make a copy of the config file first just in case.) Under “config interface ‘wan'” change the line “option proto ‘static'” to “option proto ‘dhcp'” and delete or comment out (with #) the lines beginning “option netmask”, “option ipaddr” and “option gateway”. So, for example:
root@DYDTECH:~# cp /etc/config/network /etc/config/network.bak
root@DYDTECH:~# vi /etc/config/network
(use arrow keys to navigate and type `i` to enter “insert” (edit) mode)
under config interface ‘wan’:
change `option proto ‘static’` to `option proto ‘dhcp’`
change `option netmask xx:xx:xx:xx:xx:xx` to `#option netmask xx:xx:xx:xx:xx:xx`
change `option ipaddr xxx.xxx.xxx.xxx` to `#option ipaddr xxx.xxx.xxx.xxx`
change `option gateway xxx.xxx.xxx.xxx` to #option gateway xxx.xxx.xxx.xxx`
type `esc` to exit insert mode
type `:wq` to save the file and quit
End product of the wan interface stanza should look something like:
config interface ‘wan’
option ifname ‘eth0.2’
option force_link ‘1’
option macaddr ‘c8:ee:a6:1a:2b:3c’
option proto ‘dhcp’
option type ‘bridge’
# option netmask ‘255.255.255.0’
# option ipaddr ‘10.0.10.190’
# option gateway ‘10.0.10.1’
Alternatively, you could issue these commands, which should work assuming your config file hasn’t been altered and is fairly similar to the one on my device. Each command copies the file before changes are made to a backup file, just in case, but *use at your own risk*! I’ve tested these but am not a sed expert by any means.
root@DYDTECH:~# sed -i.bak -E “:1; /config interface ‘wan’/! { n; b1 }; :2; n; s/option proto ‘static’/option proto ‘dhcp’/; b2” /etc/config/network
root@DYDTECH:~# sed -i.bak -E “:1; /config interface ‘wan’/! { n; b1 }; :2; n; s/option netmask/# &/; b2” /etc/config/network
root@DYDTECH:~# sed -i.bak -E “:1; /config interface ‘wan’/! { n; b1 }; :2; n; s/option ipaddr/# &/; b2” /etc/config/network.bak
root@DYDTECH:~# sed -i.bak -E “:1; /config interface ‘wan’/! { n; b1 }; :2; n; s/option gateway/# &/; b2″ /etc/config/network.bak
3. In the network config file, the mac address for the wan interface might not be what’s on the sticker, and instead be one digit off (as pointed out in another comment). What’s on the sticker is the device’s lan interface mac address. To just get the correct mac address to set up static address assignment or whatever, check this config file. Of course it can also be found by running `ifconfig` once connected via telnet/ssh.
4. To set up private key/”passwordless” ssh authentication (i.e. what would be done by `ssh-copy-id` when using openssh) for dropbear this will work:
ssh root@192.168.1.100 “tee -a /etc/dropbear/authorized_keys” < ~/.ssh/id_rsa.pub
cheers
Joseph g (store manager) –
Thank You Sir
Anton Korzh (verified owner) –
how can check which version is mine – purchased week ago
telnet isn’t working – any help?
otherwise simplest functionality works – I was able to change ip so it matches my subnet and on/off works
Joseph g (store manager) –
If you purchase this in 2022 it is the new version. Please update the firmware here https://drive.google.com/drive/folders/1e371xvOHyLdKSKoWVWo3MLVRL-j713f4?usp=sharing
rthinds (verified owner) –
WARNING!!!!WARNING!!!!WARNING!!!!WARNING!!!!WARNING!!!!
Attempting to flash this new BIOS on these Gen2 Power Mgmt boards AFTER you have changed the IP address to your own local network quite possibly will result in a bricked card, as that is exactly what happened to mine.
After uploading the “FirstFile” BIOS file, the card reboots itself and the IP address reverts back to the default 192.168.1.100. Re-attaching to that IP address to continue the firmware upgrade looks like it someone attempted to code it for this possibility as a BIOS file selection window appears, but the browser gets stuck in a rapid-fire re-connect loop (no matter which browser I use).
If/when you’re finally able to select “Upgrade” from that window (if you try enough times), selecting the “SecondFile” BIOS file does nothing. In fact nothing works, not even powercycling the card or pressing the master “RST” button on top of the card. You’ll also notice the addition of a nice little red LED now illuminated on the card….=(
The video that accompanies the BIOS files indicates he’s performing the upgrade on the (default) 192.168.1.100 network. I also suspect you need to start the “SecondFile” upload before the card decides to reboot itself, but I’m fresh out of Power Mgmt cards for another attempt.
So far I’ve been unable to find a recovery mechanism once this happens.
Joseph g (store manager) –
Please reach out to us using our contact page, we will replace it for you with a unit already flash. Thank you.
rthinds (verified owner) –
Annnnd of course as soon as I send that previous forum post, things have changed and now I’m back in business (darn I wish there was an “edit” or a “delete”).
I think the rapid-fire re-connect loop of the browser eventually “gives up” after about 15 minutes or so.
– Then, from a computer on the default 192.168.1.100 network, I selected the “FirstFile” BIOS file and uploaded.
(Don’t be fooled! The “Upgrade” button of the window actually should read “Select…” because it opens a filesystem navigation. Double-clicking the correct file starts the upload, even though the status bar doesn’t work).
– Then wait. And wait.
– And wait.
– Eventually it should respond with an “Upload Success!” popup.
– Then go hard powercycle the Pwr Mgmt Card – I waited about 30 seconds before poweron.
– Then navigate back to 192.168.1.100 *from the same browser* (it should be not be repeatedly re-connecting) and select the “SecondFile” BIOS file. Simply double-clicking starts the upload, again – the status bar doesn’t work.
– Then wait. And wait.
– And wait.
– Then wait some more….probably 5 minutes.
– I’m not sure, but I don’t think I ever got a “Upload Success” confirmation popup.
– I simply hard powercycled the card again…
– And now navigating to 192.168.1.100 works like it should.
– Then change the IP to my local network and all is good.
– FINALLY!
Yes, the red LED is still ON, so I’m not sure what’s happening there, but the UI is the classic Parallel Miner look-and-feel.
Now on to enabling ssh/telnet/whatever. I DGAF as long as I can control it programmatically….
rthinds (verified owner) –
@Mike H.
“I hooked up to the serial port (note the “vcc rx tx gnd” on the 4 pin that’s classic serial port!)”
There’s literally no other pins on the Gen2 Power Mgmt board. Are you referring to Gen1? cuz Gen2 is out now, and that is what everyone is purchasing now.
If you’re referring to needing a “special cable” to connect to the 4-pins on the Gen1 board, could you PLEASE make that clear next time?
–
“For now – you can just telnet in. Yup. Telnet is open and configured”
No it’s not. Port 23 is NOT open nor responding on the Gen2 Power Mgmt board. Neither is port 22 (ssh).
–
“type chip that is somewhat ubiquitous and designed specifically for openwrt – which is what it is running.”
This Power Mgmt board is in NO WAY running openwrt. openwrt is opensource for WiFi routers, not a proprietary Power Mgmt board such as this.
Are we sure we have the correct comments posted to the correct forums? Cuz I’m thinking “NO.” If you read Mike H’s comments, he’s referring to a WiFi router, NOT a Power Mgmt Board, which is where his lengthy comments are attached.
Let’s strive to do better…
Anton Korzh (verified owner) –
feature requests:
-setting to power on on power on or not
-setting power on and off on daily timer (dont want to mine 4pm to 11pm ie because too hot)
-IFTTT integration – based on temperature sensor or smth
-push notifications, ie telegram bot
-commands on telegram bot
Stephen DeBarros (verified owner) –
Great product. Easy to setup and works great
Jonathan Hanson (verified owner) –
Best product at the best price.
Anonymous (verified owner) –
prob the best investment to save gas!! haha
Alex –
Dead after 8 month. Parallel won’t replace it since it’s only 30 days warranty, which says a lot about this made in china product.
It’s only a 5$ card with some serious security issues and a buggy web interface and a total lack of updates.
A 10$ smartplug is way better in any way, connectivity, updates, interface, security, mobile app and other features like planning. Just plug it to the ZSX board and you’re good.
Anonymous (verified owner) –
Pretty happy with this so far, however the GUI is very slow and doesn’t allow me to change the password. Change pw button does not work.
Anonymous (verified owner) –
Have not installed this yet.
Anonymous (verified owner) –
Finally have a way to manage my uptime during high-peak hours, or when the temperature outside is 100°+(37C°)
MCB –
Device doesn’t work and it looks different than the devices shown on videos.
Device is powered with USB power adapter that delivers 2.1amp.
LAN connected as mentioned.
Tried all troubleshooting tips.
Tried the RST button to….looks like device reboots.
Even I configured a router with IP 192.168.1.1 then connected the device to that router. Nothing comes up when I try 192.168.1.100 in the browser.
Device does not show up in the router connected device list.
Joseph g (store manager) –
Please reach us via our Contact us page and ask to speak with Albert for Support. Ask to speak with Albert
Anonymous (verified owner) –