


Product Description
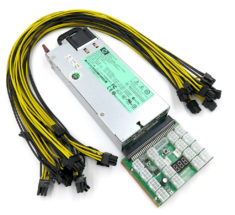
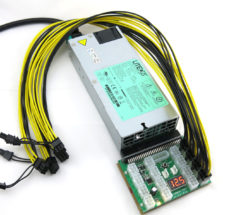
Although this kit can be used on any ATX Motherboard the quantities of the following components are geared for the ASRock H110 Pro. This kit offers a complete power solution using ONLY TRUE Server Platinum Power Supply at 94% efficiency. As a result, no ATX PSU is required. Further, having a single source of power between the Motherboard and GPU's increases stability.
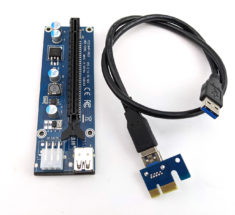
We included a remote power management module with each kit. Giving you the ability to power cycle the entire rig from anywhere or pre-schedule power cycles.
** Motherboard and GPU's are NOT Included in this Kit; Pictures are for reference only **
What's Included in this kit
- Platinum 94 Certified Delta 2400 WATT 200-240V PSU with (1) X11 + (1) X11 / X11 Amp, OR (1) ZSX + (1) X11 / X11 Amp Breakout Boards for a total of 32 PCIe ports
OR (2) Platinum 94% Certified 1200 WATT 110-240V PSUs , with (2) X11 OR (1) ZSX + (1) X11 Breakout Boards for a total of 32 PCIe ports - (10, 20) 24 inch 16AWG 6 Pin Male to 8 Pin (6+2) Male PCIE Power Cable **
- (6, 13) 18AWG PCI-E 6+2pin Extension Y-Splitter Cable **
- (1) 180WATT 24PIN ATX Power Module + SATA, MOLEX, CPU POWER ***
- (1) 4PIN MOLEX Y-Splitter Cable Adapter 6in
- (1) Cable adapter PCIe to Molex female 24in
- (1) Power Management Module for Parallel Breakout boards
- (1) C19 to C14 power cord for the 2400watts only ****
** Depending on your selection for 6 or 13 GPUs. We will include 10 cables and 6 extension Y splitters with the 6 GPU kit; 20 cables and 13 splitters with the 12 GPU kit.
*** Depending on your selection between Pico and ZSX board. ZSX Board Manual available here as a PDF.
**** Depending on your selection between 2400watt and 1200watt PSU. The power cord is not included for the 1200watt, which needs a C13 cable.
Installation:
No instructions are included. However, we will monitor and reply to all comments in the discussion tab. We encourage the community to also reply and comment with their experiences and collective knowledge. The above list of components included is linked to each item's listing with detailed specs. Please review the individual items for full guidance.
Please review the ZSX to motherboard wiring guide.
As always, we highly recommend installing these components in steps and test each step before moving to the next one. The first step would be to power up the Motherboard with the ATX 24pin adapter, get a screen, and access the bios. The second step to set up and run two GPU's. Next, add two extra GPU's at a time and powering up and down until all are installed. Finally, "the fun part," clean up and secure all cables as desired.

Jerad S. (verified owner) –
Great customer service! Quick to respond and answer questions. Will definitely be using yall again! Thanks!!!
Kevin B. (verified owner) –
Product is as advertised. Works great. Issue with selling items that are on back order with no notification. This delayed shipping. Spoke with support and seems they realized their issue and promised to fix.
Colby Gantt (verified owner) –
Update: I’ve gotten the chance to use the products I bought and I can honestly say they are top notch, very high quality products. Not only are their products amazing but the prices are also very low compared to competitors.
Also, as I mentioned already, the customer service is incredible! Two people stand out the most; Missa-Lynn and Joseph. They did a lot for me and I couldn’t be more grateful for that. The extra cables they threw in was such a nice touch and really shows they care about their customers. I will always come to Parallel Miner first when buying mining equipment. Thanks Missa! Thanks Joseph!
Unfortunately, I cannot say the items are quality products….yet, because I have still not received my order. I ordered Feb. 3rd. Some of the items in ASRock H110 kit were not actually in stock even though it was listed as in stock. By the time the order finally did ship (Feb. 17), bad weather caused FedEx delays. Tracking number shows no activity since 26th, but hopefully that means it’s otw. So I missed out on some of the really high prices of Eth but hopefully we’ll see another spike soon. There was some things done to try and make it right, which I do really appreciate. I will say that the customer service is fantastic. Missa-Lynn is who I mainly communicated with and she went so far above and beyond to help me in every way she could. Literally 77 emails were exchanged! Parallel Miner is very lucky to have someone like her representing their company. Great job Missa! Thank you for everything! Hopefully, when I finally do get my shipment, I will come back to leave a better review as I am pretty confident their products are high quality.
James F. (verified owner) –
Brad C. (verified owner) –
I have only had this in production for two weeks, so we will see how it stands the test of time, but I can’t speak highly enough of this solution. The PSU are extremely quiet and stable, the cables and breakout boards are well built and simple to work with. I don’t know why you would buy an ATX PSU at 4x the cost and then try and figure out all the cables and adapters on your own. This solution is about a simple as you can get in the world of GPU Mining.
Nicholas C. (verified owner) –
This kit was perfect. I wish it was in stock when I first started my build. I made about every cabling mistake possible trying to piece meal it together. The only thing that would be helpful is a video explaining how to connect things safely. That would make this amazing kit even more awesome.
Kenneth McCleery (verified owner) –
So far so good!!
Kenneth G. (verified owner) –
Veniamin K. (verified owner) –
Perfect
Molly Evans (verified owner) –
Awesome power kit
Steve M. (verified owner) –
Daniel S. (verified owner) –
Am I allowed to say Fing amazing..
Clayton Milam (verified owner) –
Would have been perfect if the jumper cable came with it. Now I have to buy another cable that I was supposed to get with my combo kit and pay shipping that costs twice as much as the darn cable. Other than that the psu’s work flawlessly.
Paul (verified owner) –
Only issue so far is it did not include the sync cable so I was not able to a tivate with one button I have to switch all separate
Bradley (verified owner) –
So happy with my order. Thank you!
Greg (verified owner) –
Great Product and Great Company
Henry (verified owner) –
Very Knowledgeable and quick response to help solve any issues.
Anonymous (verified owner) –
Dayle (verified owner) –
Great fast accurate service. Will be ordering again!
bigskyparts (verified owner) –
Worked great for a month, added another card to the rig so I plugged in the molex jumper and smoked my board and the zsx breakout board.
Joseph g (store manager) –
Hi Alex, we appreciate your business. I’m sending you a FREE replacement tomorrow. The Molex mark SATA is the only one you should use, it should only power an SSD and with the H110 board the two Molex on the board. Do not use GPUs directly on the Mboard or you will smoke it again. All GPUs should be put on Risers. The risers should be powered by the PCI-E 6pin of the ZSX. The replacement will go out FedEx 2 days.
Arran (verified owner) –
Hi there, Just seen this – same problem as Alex.
I had a H110 with SSD running from ATX psu with 10 GPUs. Molex connectors and the sata connector on board were all connected as per instuction in Asrock manual for stability etc (as well as all powered risers)
Received my PM power kit – yesterday I did a swap over, with the new PSU I couldn’t get the board to recognise that the on board molex were powered, it would show graphic to say molex need power then go into the bios.
After 2-3 reboots and checking all cables – suddenly smoke from near the motherboard CMOS battery, a chip on board has melted now my board is junk.
ZSX – has two options for molex power, I read the instructions there is one molex specifically to only power a SATA hard drive?, I presumed nothing else should go on this connector?
How should I be powering the single on motherboard SATA connector – there is only one SATA cable provided and it is for hdd?
With that in mind I used the provided 6 pin pci-e to molex cable, and split it using the provided splitter to power both molex – is this not correct?
Joseph g (store manager) –
Hi Arran the H110 has two 4pin Molex that need to be connected. The board needs to sense voltage there in order to pass boot bios. If it was looking for the 12volts only that would be easy but it does look for 5volt. So you will have to split the Molex on the ZSX mark SATA with https://www.parallelminer.com/product/4pins-molex-y-splitter-cable-adapter-6-inch-long-highest-quality-cables/ So as long as you have no GPU’s installed on the Motherboard directly it will be perfectly fine. You can also power your SSD. Do not connect anything on the ZSX two mini 4 pins Molex these are for sync. Also, the second Molex near the top is for remote-only use. You most likely damaged the ZSX as well and I have no problem sending you a free replacement.
Chad (verified owner) –
I placed an order that was closed without notice which didn’t make me happy. 5 days later I realized what happened and re-placed the order. I was happy with the second order and not the first which is why I rated a 3.
Arran (verified owner) –
Thanks for your reply, from reading the instructions I thought the sata was for hdd only – I will try as you suggested, ordered new motherboard, a replacement ZSX would be great to avoid any repeat.
jet –
Can two 6pins on the ZSX board power a Nvidia 3080?
Joseph g (store manager) –
Hi Jet, Yes using true 16AWG cable such as https://www.parallelminer.com/product/24-inch-16awg-6-pin-male-to-8-pin-62-male-pcie-power-cable/ will allow you 8pin and 6pin. Which is plenty of power
Volodymyr F. (verified owner) –
jet –
When using PCIE to MOLEX and MOLEX Splitter, my H110 will power on but not post. Using a different PSU, the H110 boots just fine. Any suggestions?
Esequiel C. (verified owner) –
Quick shipping, Great quality, great packaging.
Arran (verified owner) –
Hi Again… I have now bought a new H110 motherboard after frying the previous one, this time after reading these discussions connected single Molex next to CPU to the SATA molex on the ZSX , connected main 24 pin cable, connected one powered riser with card, Now also using MSATA hard drive on board.
When switching on orange LED on ZSX board, press power button nothing seems to happen.
Pressed power button a second time, this time some smoke from the ZSX board. is this ZSX board junk? 🙁
Arran (verified owner) –
@ Joseph g – can you confirm if you have posted the replacement ZSX? – as mine looks like mine is not working properly as you suspected.
Joseph g (store manager) –
If you need a replacement, please request an RMA Request from our website. Login My Account > Dashboard > Orders > Select the correct order and > RMA REQUEST
fponce711 (verified owner) –
Been using the 2x 110v H110 kit. Has been great, my only question is how much sustained power draw can come from 1 6pin port on breakout board?
Currently I have been running 2 separate cables from board into 30 series cards. Is it safe to plug 8 pin Y splitter into 30 series card and run 1 24in cable from splitter into board?
Been trying to look into power draw per port but can’t find the info, should I be using Y splitter on card or keep 2 cables into each card?
Joseph g (store manager) –
Calculate how much each GPU draws. If you are at 250watt or less you can safely use the Y splitter. “Been trying to look into power draw per port but can’t find the info” It’s not obvious; every port is connected to the same NEG & POS. Pretty much they will give power until they melt. So it’s important to use as many ports as possible to spread the load equally. If you can share setup pictures with me I would offer you a $75 coupon code. Send as many as possible to h110setup@centrix-intl.com
Bryce J. (verified owner) –
Thank you so much to to the folks at Parallel Miner. Great products and great customer service. This kit rocks! My new number #1 for mining equipment and cables. So much better than using ATX
Leonardo Alves (verified owner) –
Anonymous (verified owner) –
For now, all is fine, but shipping into EU cost too much
Joseph g (store manager) –
Hi, shipping cost is presented during the checkout process. Any other charges are duty & taxes imposed by your country. Always message us when you are from a country with high taxes prior to shipping the order. We might be able to help
Roy (verified owner) –
Only have 5 GPUs currently, but no issues. Watched the video to hook up correctly, much easier to follow than reading direction for me. Shipped quickly.
Joseph g (store manager) –
Hi Roy, I will link that video here for others. Thank you, Sir. https://www.parallelminer.com/videos/rabid-mining-crypto-tech-h110-pro-btc-kit/
Dustin (verified owner) –
Love it!!!! Works great and easy to set up!!! Buying another one soon!! Great customer service and fast shipping!!
Pedro D. (verified owner) –
Excellent.. All items included just like they announced, deliver in time. Five stars…
Anthony (verified owner) –
Best mining purchase anyone could make. Easily powers the top mining gpu’s. Would recommend adding a few extra 6 – 6+2 and 6+2 splitter cables, at current #s a rig with many 2 – 6+2 power hook ups for the gpu would be lacking connectors.
William T. (verified owner) –
High quality psu and low priced motherboard. Thorough instructions with good FAQs. I saved over $700 replacing two EVGA Platinum PSU s with one PSU from ParallelMiner. I forgot a cable on my order and they sent it for free – That Same Day! Don’t hesitate to take the leap for your mining needs – this group will not disappoint.
Anonymous (verified owner) –
Anonymous (verified owner) –
Wonderful product!!! Definitely will purchase more as I grow my mining business and let my partners know about this great product. One thing to add though is that I wish it had instruction of some sort to know what the “leds” mean on the board. And possible some trouble/faq for installation and such. Keep up the good work!!
Michael M. (verified owner) –
Man everything just as expected plus more had a picture i wanted to post but the reviews aint enough for the customer service you guys bring to the table.. 5x 2400w kit 🔥🔥🔥
Octavian L. (verified owner) –
Good quality cables and power supply!!
Dustin (verified owner) –
2nd one I have ordered! Love this setup!!
Thomas Grenier (verified owner) –
Any idea how I can go about troubleshooting the 1200w x2 setup no longer synching?
Has been working fine for the last 6 months… Turned rig off yesterday, went to turn it back on later that night, but all of a sudden now only one psu will run at a time.
Joseph g (store manager) –
Unplug the sync cable, turn all PSU off, reconnect the sync cable on all PSU then power the first one and the other should follow