

How To Properly Connect the ZSX Breakout Board and Your Motherboard: A Wiring Guide with Pictures
December 2020 saw the decisive end of the cryptocurrency winter, but it was also the month that Parallel Miner's game-changing all-in-one ZSX breakout board was officially released as a belated Christmas / Yule gift for our customers worldwide. The ZSX breakout board is compatible with two different server power supply pin configurations so it can be used with many different common and popular PSUs. The following year we released the upgraded ZSX Amp breakout board.
In 2023, we released the X15B ZSX board, which is compatible specifically with Dell server PSUs. (Pro Tip: you can find the full breakout board compatibility list here to ensure you buy the correct breakout board/PSU combination.) This guide is for every version of ZSX breakout board.
Although a lot of this information could be found in the ZSX breakout board manual, we were getting a lot of questions about how to correctly connect everything to a motherboard. In this ZSX wiring guide, we will primarily use the BioStar TB250-BTC motherboard, but the process will be almost identical for all other motherboards. If you have questions about your specific motherboard that this guide doesn't answer, then please contact us!
ZSX Breakout Board Ports And Cables Overview Guide

- 5V Remote Sensing Molex Port - Connect our optional remote management module to remotely turn your rig on/off or set up a recurring power cycle.
- Two 4pin Ports - Interconnect our compatible breakout boards so all linked PSUs turn on/off together. Currently, we offer a 19-inch interconnect sync cable.
- ATX 24pin Port - To power your motherboard. The included cable also has a CPU 4+4pin plug.
- SATA Labeled Molex Port - Use the included especially wired cable to provide Molex/SATA power to 1 HDD/SSD. This port does not push power unless the blue LED light is on.
- 6pin PCIe Ports - 16 ports to power your motherboard's Molex ports, your GPUs, and PCIe-powered risers.
- Fan Hub Ports - 10 ports to connect your fans to keep your rig cool. Tested and confirmed to support up to 500W (if available from your PSU). Fans will run at 100% by default.
- PWM 4pin Port - Want to control your fan speed for a column of connected fans? Connect the optional PWM fan cable to your motherboard's chassis/system fan port. (Pro Tip: The ZSX-Amp has only 1 control port for all 10 fan ports.)
***Please Note: Ports number 3 and 4 on the ZSX board share a combined 180W maximum output. Pulling more than 180W can damage the ZSX.***

- Molex Splitter - Ideal for motherboards with multiple Molex ports that demand power.
- 6pin to 6+2pin PCIe - Use these PCIe cables to power your GPUs and risers. This 6+2pin can conveniently be used as a 6pin or as an 8pin! (We have other PCIe cables available as well.)
- 4Pin PWM Fan Cable - This optional cable allows you to control the speed for the associated column of connected fans. Without it, the fans will also be at 100% power.
- 4Pin Fan Extension Cable - Use this 22inch cable to extend your fan's cable to reach the ZSX board fan ports.
- ATX 24pin With CPU 4+4pin - Bundled with the ZSX, this cable is used to power your motherboard and CPU.
- Molex to Molex and SATA - Wired specifically to be used with our ZSX board's Molex port, this cable is meant to provide power to an SSD. This cable is bundled with the ZSX.
- Tip: We now also offer the above 2 cables together here without a ZSX board.
- PCIe to Molex - Power the Molex ports on your motherboard via the ZSX board with these PCIe cables, with or without a Molex splitter.
- Not pictured: Interconnect Sync Cable - Connect all of our compatible breakout boards to power on/off together when you press the power button on any of the connected boards.
- Not pictured: PCIe to CPU 4pin - For motherboards, such as ASUS Prime X570-P, that require 8pin AND 4pin for full CPU power.
Motherboard Ports Overview Guide
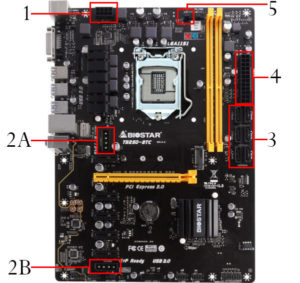
- CPU Power Port
- A and B: Molex Ports
- SATA Data Ports
- ATX 24Pin
- SYS Fan Port (Chassis Fan Port for PWM Control)
An important note about motherboards in general: not all motherboards have the same number of Molex ports. The ASUS Z270-P, for example, doesn't have any at all.
An important note specifically about the ASUS B250: this motherboard has 3 different 24pin ports, but only port A is required. Ports B and C were included with the assumption that you would need two extra ATX power supplies to power the GPUs and, therefore, would need a way to turn these PSUs on and off. Our server PSUs completely bypass this, making the two extra 24-pin ports useless. However, all 3 Molex ports on that mobo are required!
The Guide: How to Wire the ZSX and Motherboard Together
Step 1

Connect the ATX 24pin cable to the ZSX board.
Attach the other end of the cable with the CPU pin to your motherboard.
Step 2
Next, connect the CPU power onto the motherboard.
Step 3


 If you are using an SSD on your motherboard, then connect the Molex plug with 8 wires into the ZSX board's SATA labeled Molex port.
Attach the appropriate Molex and/or SATA cables to your SSD.
Populate your motherboard's SATA port, as necessary.
(Pro Tip: don't actually unplug any cables in this or any of the following steps. The pictures were starting to look too busy to see each step.)
Step 4

 If your motherboard has Molex ports that require power, then it's time to juice them up. Use any combination of the PCIe to Molex cable(s) and the Molex splitter cable(s) as desired.
Step 5

 Double-check all connections!
Step 6: Testing
Post the motherboard with the minimum required: CPU, SSD, and one GPU/riser.
Press the power button on the ZSX board and manually turn on your motherboard (unless your BIOS is set to auto-on with power).
Once it successfully posts, add your remaining GPUs one or two at a time. Retest and continue until all are set and running.
Optional Step - PWM Fan Speed Control
 Attach your fans to the ZSX ports (not pictured).
Connect the PWM fan cable to the header of the column of fans you want to control and to the CHA / SYS fan port on your motherboard.
If you need them, we also have a PWM cable with fan extension cables kit available.
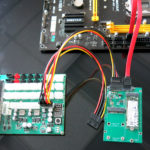
Optional Step - Remote Power Management

Connect the remote power management module to the top Molex port and set it up to your needs.
For GPU mining, you will most likely not use the power cycle option but, instead, use the remote access to turn the entire setup on/off.
Please refer to the XRMT user manual for directions, FAQs, and troubleshooting related to this product.
Final Step in this ZSX and Motherboard Wiring Guide
Finish up with cable management to your liking.
Miscellaneous FAQs and Troubleshooting
 Q: My ZSX isn't working with your Delta 2400W PSU?!
A: First, the Delta 2400W PSU only works on 200-240V, so please double-check that you aren't accidentally connected to American standard 110/120V.
Second, the 2400W PSU has two ports: the slave port (PSU power plug side) and the master port (PSU fan side), the ZSX needs to be attached to the master port as pictured. The slave port only pushes power to the PCIe ports, regardless of which breakout board is attached. None of the extra features (Molex ports, interconnect sync, etc) work on the slave port. The (now retired) X8 is the perfect breakout board for the slave port.
Q: My H110 won't power on with 3 GPUs connected.
A: Go into your BIOS and deselect the power check warning option under the Advanced menu, Chipset Configuration. Please contact us if that does not resolve your issue.
Q: Does my H110 really need the Molex cables when I have powered risers?
A: The manufacturer included the Molex ports for a reason. We give you a way to provide power to them, but it's up to you if you use them or not. The manual says that the Molex ports not only are to provide supplemental power to the board but also increase stability as well.
Q: What do I do if my motherboard needs more than 8pin for CPU power?
A: We know that there are some mobos which require 8+4 CPU pins for power. For the 4pin connectors, you can use this PCIe to CPU 4pin cable.
Q: What are the major differences between the ZSX, ZSX Amp, and X15B ZSX breakout boards?
A: The ZSX and ZSX Amp share the same PSU compatibility. The Amp version has a single fan control port for all 10 fan ports and an on-board LED voltmeter and current display. Meanwhile, the X15B ZSX is compatible with an entirely different PSU pin configuration. (Pro Tip: you can find the full breakout board compatibility list here.)

Originally posted February 7th, 2021. Last updated January 17th, 2024.


37 Responses